 This is a look at an often missed function of the Speedlite 580EX II flash, but first a bit of a history lesson.
Recalling the times before digital, the days when there was no electronic communication between lens, camera and flash. Back in those days photographers relied on each part of the camera system to perform optimally on it's own; frequently with manual input from the photographer to ensure needed info passes from one device to another. A flash I owned had a blue and orange scale on the back and a matching switch with blue and orange positions. The blue corresponded to f/8 and the orange was f/4. There was a range of distances that the flash could reach for each of the settings. All that was needed was to set the aperture on the camera lens to either f/4 or f/8 to match either blue or orange on the flash. The flash fired, measured the light coming back and quenched the output when it decided enough light had been output; often it was linked with the term thyristor after the semiconductor switch that was used in the circuitry.
Some photographers in more recent times used big old hammerhead Metz flashes and they had a similar arrangement often with a big distance scale dial on the top of the flash head; mostly these guys were wedding photographers with a medium format film camera.
Enough of the history, many of those medium format camera wielding photographers now have a digital SLR and they complain that these modern flashes don't work as good as their old one.
That brings us to the Speedlite 580EX II, it's the first Canon EX model Speedlite that has the self-same thyristor function, Canon call it external metering sensor and hide it in the flash custom functions.
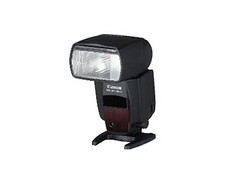
Flash Custom Function 5, flash metering mode has four options, the last two 2: External metering: Auto and 3: External metering: Manual are the new "thyristor" modes. The Speedlite 580EX II has a little circular window on the front lower left corner on the picture above, that's the sensor that measures the flash and tells the flash gun when to stop firing in these thyristor or external metering modes. Remember to point that window at the subject when you use these modes!
2: External metering: Auto
Wth this setting the flash will be sent the ISO speed setting and the aperture in use from the camera automatically. Using this the flash works out the range and will indicate it in meters or feet on the back of the flash display panel. Even flash exposure compensation can be set. When the picture is taken the flash will fire and the metering of the light reflected from the scene is measured by the Speedlite 580 EX II's sensor, not the cameras metering. Also this means you don't see a pre-flash it's not needed.
To get the custom functions on the flash, press and hold the Cfn button on the flash and perform a great sequence of dial turns and button presses to set Cfn 5 to 2 or 3. Alternatively if you have one of the following EOS models EOS-1D Mark III, EOS-1Ds Mark III, EOS 5D Mark II, EOS 50D, EOS 40D, EOS 450D or EOS 1000D you can put the flash on the hotshoe and go in to the camera menu for flash control and set the flash custom function there.
-blabpictures-
3: External metering: Manual
With this setting the flash performs like the "good ole" Metz models of yesteryear. You need to tell the flash the aperture you want to use, you need to tell the flash the ISO speed you are using and then it works out the distance and will show the range scale on the back. When the picture is taken the flash fires and the metering sensor quenches the light when the flash determines enough light. You also don't get a pre-flash. Even better for the low tech, you can put the PC socket on the side of the flash to use and fire the flash with a PC sync cable or even a pocket wizard.
To get the custom functions on the flash, press and hold the Cfn button on the flash and perform a great sequence of dial turns and button presses to set Cfn 5 to 2 or 3. Alternatively if you have one of the following EOS models EOS-1D Mark III, EOS-1Ds Mark III, EOS 5D Mark II, EOS 50D, EOS 40D, EOS 450D or EOS 1000D you can put the flash on the hotshoe and go in to the camera menu for flash control and set the flash custom function there.
One application of the External metering: manual setting is for light painting. If you think that you want to light up that big building at night and you only have one flash, then set the camera on a tripod, choose the aperture and ISO, select bulb mode, open the shutter with a remote release and then walk around the scene firing the flash using the test button on the back to light each part of the scene.
-blabpictures-


No comments:
Post a Comment