No blog Sunday, time to go and take some photos. See you Monday
-blabpictures-
30 November 2008
29 November 2008
Shutter life
How long will my camera shutter last?
For many users, that's a common question, especially now Canon publish shutter life ratings in the specifications.
So, to save you hunting around the web for them , we thought we'd put them all into one place so you can find out easily.
Now, the thing about shutter life is this. Just because a shutter is rated to 100,000 frames, does not mean at 100,001 frames it will die. Equally, it's not a guarantee that it'll reach 100,000 frames. We know several photographers who have far exceeded the expected shutter life of their camera - one I know of claims his EOS-1D Mark II is well over 1million frames already. That's a LOT of images.
So, without further ado, the published shutter life counts for EOS cameras:
EOS 30D - 100,000
EOS 40D - 100,000
EOS 50D - 100,000
EOS 5D - 100,000
EOS 5D Mark II - 150,000
EOS-1D Mark II - 200,000
EOS-1Ds Mark II - 200,000
EOS-1D Mark IIN - 200,000
EOS-1D Mark III - 300,000
EOS-1Ds Mark III - 300,000
Now, for those of you thinking that 100,000 is not THAT many, look at it like this. It would allow you to take c.274 pictures every day for a year. Or c.137 pictures every day for two years. Or c.91 images a day for three years. Or more realistically, if you shoot mainly at weekends, that's c.408 pictures every weekend for two years. When was the last time you took 400 pictures in a weekend?
-blabpictures-
28 November 2008
WiFi grips gotcha
If you are thinking to get one of the WiFi 'grips' for your Canon EOS camera don't get caught out with this supremely annoying gotcha.
Canon Wireless File Transmitters WFT-E1, WFT-E3 and WFT-E4 need to have a battery installed to work and the battery is not supplied in the box with the WiFi grip.
Yes you read that right, you spend all that money on a WiFi grip only to find you need to put a battery in it. Even better is that the battery in the WiFi grip cannot power the camera and the grip. So if you plan on getting a WFT-E1, WFT-E2 or WFT-E3 don't forget to get the additional battery or else you can have camera operation and no WiFi - OR - WiFi operation and no camera.
WFT-E1 for the older EOS-1D Mark II, EOS-1Ds Mark II, EOS-1D Mark II N, EOS 5D, EOS 20D, EOS 30D needs a BP-511A battery (and charger if you're using an EOS-1D model; double doh!)
WFT-E3
for the EOS 40D and EOS 50D (firmware update to v2.0 needed) needs a BP-511A battery. You can use the charger that comes with the camera to charge this battery
WFT-E4 for the EOS 5D Mark II needs an LP-E6 battery. You can use the charger that comes with the camera to charge this battery. Though since the LP-E6 is new and exclusive to the EOS 5D Mark II they could be in pretty short supply now that EOS 5D Mark IIs seem to be hitting the stores.
Lucky people with an EOS-1D Mark III or EOS-1Ds Mark III and the WFT-E2 sleep safe since the camera does provide power to this one.
-blabpictures-
Canon Wireless File Transmitters WFT-E1, WFT-E3 and WFT-E4 need to have a battery installed to work and the battery is not supplied in the box with the WiFi grip.
Yes you read that right, you spend all that money on a WiFi grip only to find you need to put a battery in it. Even better is that the battery in the WiFi grip cannot power the camera and the grip. So if you plan on getting a WFT-E1, WFT-E2 or WFT-E3 don't forget to get the additional battery or else you can have camera operation and no WiFi - OR - WiFi operation and no camera.
WFT-E1 for the older EOS-1D Mark II, EOS-1Ds Mark II, EOS-1D Mark II N, EOS 5D, EOS 20D, EOS 30D needs a BP-511A battery (and charger if you're using an EOS-1D model; double doh!)
WFT-E3
for the EOS 40D and EOS 50D (firmware update to v2.0 needed) needs a BP-511A
WFT-E4 for the EOS 5D Mark II needs an LP-E6 battery. You can use the charger that comes with the camera to charge this battery. Though since the LP-E6 is new and exclusive to the EOS 5D Mark II they could be in pretty short supply now that EOS 5D Mark IIs seem to be hitting the stores.
Lucky people with an EOS-1D Mark III or EOS-1Ds Mark III and the WFT-E2
-blabpictures-
27 November 2008
Going to extremes in Belgium
Catching up on some blog reading I landed on the Confessions of a Photographer blog written Belgian professional photographer and euro-strobist Bert Stephani. Over the weekend just gone Bert was asked to help out at a Canon Belgium event called EOS Discovery, which was apparently a pretty cool event.
Being faced with most of the full set of Canon wares Bert decided to make a special kind of portrait with the mega Canon EF 800mm f/5.6L IS USM lens and an off camera Speedlite triggered with a Speedlite Transmitter ST-E2. Must have been a pretty big studio as close focus on that lens is 6 meters according to Canon's site.
You can see Bert's extreme portrait shot on his flickr account.
Bert also posted some cool portrait shots with the EOS 50D and a 50mm lens in this post on his blog.
What's your most extreme picture or bit of kit?
-blabpictures-
26 November 2008
Why DPP?

So, DPP then. What's all the fuss?
Well for a start, Canon include it with the camera. That's a bonus right off the bat. Unlike some other manufacturers, when you buy a Canon camera it's all there in the box. Thoughtful of them isn't it?
So if it's all provided, why are there so many third party RAW converters? Well, it's simple not everyone is the same and many people think if the software is given away free, it can't be any good. And that, dear readers, is mistake number one.
Now, the reasons to use DPP are several, I'm going to put two to you now:
1. No-one knows Canon files like Canon
2. Picture Styles
Number one is pretty self explanatory really. Since Canon make the camera and the CMOS sensor and the DIGIC processor, you'd think they'd know what the output would be and would therefore make a nice bit of software to make the most of it. And you'd be right.
Number two probably needs more explaining. Here's goes....
While you may choose not to use Picture Styles, the fact is when you take an image on a Canon EOS camera, the LCD display will show you a preview with whichever Picture Style you happen to have set. If you happen to take a quick chimp at the LCD panel and decide you've got the shot you're after, you'll move on. All well and good so far. Trouble comes when you put the RAW into a third-party RAW convertor. They don't deal with Picture Styles, so your image will look a little flatter and less vibrant than it did on the LCD panel. If you did indeed take a look at the LCD display and decided you liked the shot, this can be a let down.
Before you all comment and tell me that you can process back to where you were using the tools in your RAW convertor of choice, remember that means more time in front of the computer. If you're a photographer who tries to get it right in camera (and that should be all of us, right?) then you may not want to spend ages processing each image back to get it where it could be if you only used Picture Styles and DPP. And as far as I'm concerned, the less time I have to spend processing images, the better.
-blabpictures-
25 November 2008
EOS 5D Mark II Video sample
So production EOS 5D Mark II cameras have finally appeared. Hooray! Now we await the flood of videos and sample images to arrive on the web.
-blabpictures-
First out the blocks is Guardian photographer, Dan Chung. Dan is usually at the forefront of any technology and likes to get his hands on kit as soon as possible. Needless to say, he bought his EOS 5D Mark II as soon as humanly possible in China.
Now, he is well known for using Nikon cameras of late since defecting from Canon last year. However, Dan doesn't just shoot stills. More and more, he's been using video. Here is his first efforts with the EOS 5D Mark II in Beijing where he's been living for almost a year.
On a side note, this is a Tuesday post and we are treating Dan as a featured photographer. We intend to make this a regular Tuesday outing, so if you would like to be featured on the blabpictures site, leave a message in the comments and let us know!
-blabpictures-
24 November 2008
Back to basics, full automatic 'green square' mode
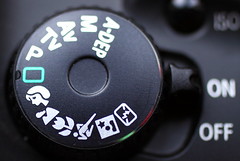 Canon cameras and many others have a wide selection of shooting modes some that employ sound photo techniques to help you take the shots you want to, some that leave you on your own to mess it all up with no-one else to blame. Apart from EOS-1D models all the range of Canon cameras have a mode dial featuring a green square where you pass almost all the photographic control to the camera and the wisdom of the Canon camera dept. Fortunately they know a whole lot about setting up your camera for taking pictures; the choices for the photographer are mostly when to take the picture, which direction to point the camera in, and how much to put in the frame. So the most important decisions are left with the photographer then.
The great thing is that green square will try it's best to see how much light is falling on your subject, where the main important part of the subject is in the frame, work out if the subject is moving toward or awy from you, decide if you would be better off using flash, and make some judgement calls on the ieal combination of shutter speed and aperture. In fact the green square function talks to the lens to find out where it's zoomed to since the more you zoom in the longer the focal length becomes and the more chance of camera shake - the camera will try to compensate by increasing the shutter speed and if necessary the sensitivity of the camera (ISO speed). You just thought it was easy shooting mode...
The camera can't tell if you want a lot of depth of field, or a really narrow depth of field to isolate your subject from the background, or maye you want to freeze some fast moving action. The camera will choose middle of the road settings to get you a technically competent picture. So if you want to concentrate on choosing the moment to take your picture, framing the scene it can really help out. Mostly the green square mode is used by people who are new to photography with a DSLR camera or people not sure what all the other stuff means - and too scared to ask or read the manual.
Green square is a great start but soon you'll want to take better pictures and that means you have to tell the camera more of what you want to acheive in the final picture. Give the camera better instructions about your intended results and it can help you make pictures that acheive them.
Green square is the first of several automated modes that go round the dial - these modes Canon calls basic zone modes, though in the days of film EOS cameras they were known as PIC modes. [PIC - programmed image control]
These basic zone modes are listed below and will be covered in future posts;
- portrait
- landscape
- close-up
- sport
- night portrait
- flash off
So green square is a nice start in DSLR photography, but better pictures need you to take more control over the settings.
-blabpictures-
23 November 2008
22 November 2008
Duct/Duck tape

"Duct tape is like The Force. It has a light side, a dark side, and it holds the universe together...."
Carl Zwanzig
No photographer's gadget bag is complete without duct (or Duck) tape. However, carrying those big rolls around can be quite heavy especially if you're a photographer who shoots in the field - wildlife, landscape, macro etc where you don't need a 10m roll of the stuff and where you do need to travel light.
It's fine for those photographers confined to the studio or shooting high end commercial work with big lighting rigs, there a roll of duck tape is hardly noticed.
For the rest of us, a metre or two is all you'll need, negating the requirements for a big roll. But how can you carry it easily?
Well, for those of you who remember film, I discovered about 8 years ago that a film canister is exactly the same width as a roll of duck tape. All you need to do is wrap 10 or 15 turns around the film canister and hey presto, instant gaffer tape on location. The real beauty of this though, is that you can still use the film canister to hold other items - blue-tac, paper clips, drawing pins, plasters, antisceptic wipes... whatever you need. And better still, it's waterproof in there as well. In fact, whether you put duck tape on the outside of a film canister or not, it's worth carrying one with some little bits in it anyway - especially the plasters and antisceptic wipes...or maybe that's just me.
Duck tape really does have a million and one uses, but no, I won't list them for you! Here's just a few things I've used it for.
* Sticking lens hoods onto lenses to stop them being knocked off
* Sticking flashguns to....well, just about anything
* Fixing broken kit
* Attaching light modifiers to flashguns
* Making random stuff
-blabpictures-
-blabpictures-
21 November 2008
Reuters shoot the Endeavour space shuttle launch
Live from lanch pad 39A
From the Reuters photographers blog on the right side bar here I picked up that they had an article about their coverage of the space shuttle launch. Watch the video to see how Scott Audette from Reuters uses the EOS 40D and EOS 30D with wireless transmitters and a custom transmission system to shoot images of the launch using cameras set out in the field hours before launch.
For Reuters the important thing is that they get the pictures from the cameras and on the Reuters wire service in about 4 minutes. This is a real edge since they can't get back to the cameras for at least two and a half hours after the launch.
Note also that Scott mentions that he's using a custom remote for sound based triggering of the camera that's built by one of Canon USA's pro reps. A guy who used to work for Nikon but joined Canon earlier this year.
-blabpictures-
20 November 2008
Better depth of field control with flash and high speed sync
With Canon's cameras and add on Speedlite flashes you usually have the chance to set high speed sync or focal plane (FP) mode to let you shoot at shutter speeds faster than the cameras normal sync speed. Why not enable it all the time?
The idea of high speed sync is that the flash fires several times rather than just at the start or end of the exposure. It needs to do this as the shutter only uncovers part of the sensor at a time during the faster than sync speed shutter speeds. Think of it as a moving slit passing over the image, since that is actually what's happening.
With high speed sync enabled you can shoot at 1/500s at f/2 for depth of field control and have the flash fire to fill-in the shadows. The downside is that you lose a bit of flash power as it needs to fire several times during the exposure. In fact the faster the shutter speed the smaller the slit making the exposure and the more times it needs to fire during the exposure; so the less power.
Most of the time you need this faster shutter speed it's because you, the photographer is using a wide open aperture so the lower flash power is actually less of a problem than it might seem.
High speed sync is available on the Speedlite 550EX, 580EX, 580EX II, 420Ex, 430EX, 430EX II, Macro Ringlite MR-14EX and Macro Twinlite MT-24-EX.
-blabpictures-
18 November 2008
Polarising filters
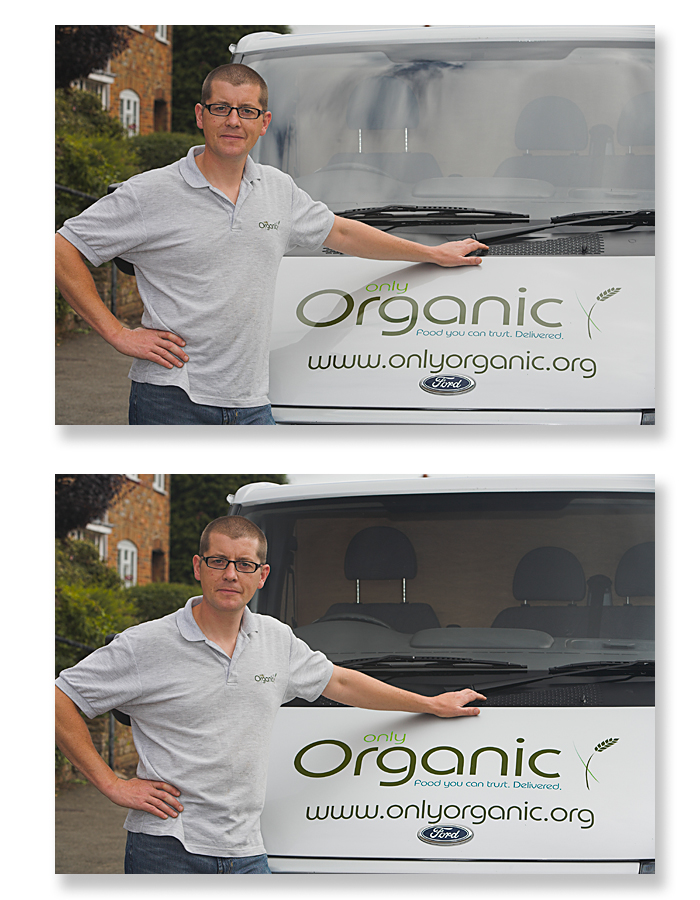 Polarising filters are not just for landscapes!
 While polarisers are the standard filter for most landscape photographers, they also have a valid place in the gadget bag of just about any photographer.
Here I was trying to shoot some images for a friend who runs his own company. The screen of his van was glaring badly in the light, so I took out the polariser to cut it out.
So, if at any time you find yourself with reflections and glare on glass or water that you need to remove, the polariser is your friend.
How does it work? Well, quite simply, they block light rays moving in a certain plane. By rotating the filter you can see the effect through the lens which makes it a lot easier to use. It won't work all the time though. If you are shooting in the sun, or with the sun at your back, you will not find muc effect of a polarising filter. To get the most out of it, you need the sun to be at 90deg to you as it was in these shots.
-blabpictures-
7 November 2008
Using a Macro RingLite MR-14EX as a master flash
The Macro Ringlite MR-14EX and also the Macro Twinlite MT-24EX can work as a master flash in the Canon Speedlite system. Problem is they are mostly thought of as macro flashes and in the brains of the designers they are not configured to fire more than additional background flashes. In this post we'll explain how this can be improved upon.
These specialist flashes are great if you only want to use an addtional Speedlite 430EX II or 580EX II as a background illumination source with the slaves set in group C. If you are thinking a bit more creatively and thinking to use the MR-14EX as a low powered portrait ringlight then you may need to control some additional flashes in groups A or B linked to the tubes on the ringlite.
The key here is custom function 5 in the ringlite or twinlite. Setting this to 1 instead of the factory default of 0 will enable the flash to trigger other wireless speedlites in groups A or B. That's all for today's top tip.
-blabpictures-
1 November 2008
Lens aberration correction - compatible lenses
Canon added lens correction functions to Digital Photo Professional in version 3. In essence the software engineers got access to the lens designers manual for each lens. In the lens manual there's the full design specification and the known optical characteristics. The software guys thought that they could improve some lenses performance with some software processing, but having the original lens designers book they could implement one of the best corrections possible; so they did. The result is some kind of special since it actually works really well, and driven by their success the software guys were out drinking with the camera firmware team and challenged them to implement vignetting correction in the DIGIC 4 processor - and so since they had some spare time and some resource in DIGIC 4 to exploit they built peripheral illumination correction in the EOS 50D and subsequent models. However the correction in camera can be thought of as a helper rather than the full solution. In camera the correction for vignetting is 50% of what DPP can do. Also DPP with RAW images can do distortion - pin cushion & barrel, chromatic aberration and colour blur corrections. Suddenly those old lenses on ebay got a bit more useful.
Here's the current list of compatible cameras and lenses with the Digital Photo Professional software. This is going to be kept live so you may want to come back sometime in the future when new models of camera and lens come out.
You can perform lens correction with the following cameras
-blabpictures-
Here's the current list of compatible cameras and lenses with the Digital Photo Professional software. This is going to be kept live so you may want to come back sometime in the future when new models of camera and lens come out.
You can perform lens correction with the following cameras
| EOS-1Ds Mark III | EOS-1D Mark III | EOS-1D Mark II N |
| EOS-1Ds Mark II | EOS-1D Mark II | EOS-1Ds |
| EOS-1D | EOS 5D Mark II | EOS 5D *1 |
| EOS 50D | EOS 40D | EOS 30D *2 |
| EOS 450D EOS Digital Rebel XSi | EOS 400D EOS Digital Rebel XTi | EOS 1000D EOS Digital Rebel XS |
*1 - Requires firmware version 1.1.1 or higher for maximum lens compatibility
*2 - Requires firmware version 1.0.6 or higher for maximum lens compatibility
| Ultra wide and wide-angle lenses | |
|---|---|
| EF14mm f/2.8L USM | EF 14mm f/2.8L II USM |
| EF 20mm f/2.8 USM | EF 24mm f/1.4L USM |
| EF 24mm f/1.4L II USM | EF 24mm f/2.8 |
| EF 28mm f/1.8 USM | EF 28mm f/2.8 |
| EF 35mm f/1.4L USM | EF 35mm f/2 |
| Standard and medium telephoto lenses | |
|---|---|
| EF 50mm f/1.2L USM | EF 50mm f/1.4 USM |
| EF 50mm f/1.8 | EF 50mm f/1.8 II |
| EF 85mm f/1.2L USM | EF 85mm f/1.2L II USM |
| EF 85mm f/1.8 USM | EF 100mm f/2 |
| Telephoto lenses | |
|---|---|
| EF 135mm f/2L USM | EF 135mm f/2.8 (with soft focus mechanism) |
| EF 200mm f/2L IS USM | EF 200mm f/2.8L USM |
| EF 200mm f/2.8L II USM | EF 300mm f/2.8L IS USM |
| EF 300mm f/4L IS USM | EF 400mm f/2.8L IS USM |
| EF 400mm f/5.6L USM | EF 400mm f/4 DO IS USM |
| EF 500mm f/4L IS USM | EF 600mm f/4L IS USM |
| EF 800mm f/5.6L IS USM | |
| Macro lenses | |
|---|---|
| EF 100mm f/2.8 Macro USM | EF 180mm f/3.5L Macro USM |
| Zoom lenses | |
|---|---|
| EF 16-35mm f/2.8L USM | EF 16-35mm f/2.L II USM |
| EF 17-35mm f/2.8L USM | EF 17-40mm f/4L USM |
| EF 20-35mm f/3.5-4.5 USM | EF 24-70mm f/2.8L USM |
| EF 24-85mm f/3.5-4.5 USM | EF 24-105mm f/4L IS USM |
| EF 28-70mm f/2.8L USM | EF 28-90mm f/4-5.6 USM |
| EF 28-90mm f/4-5.6 II USM | EF 28-90mm f/4-5.6 |
| EF 28-90mm f/4-5.6 II | EF 28-90mm f.4-5.6 III |
| EF 28-105mm f/3.5-4.5 USM | EF 28-105mm f/3.5-4.5 II USM |
| EF 28-105mm f/4-5.6 USM | EF 28-105mm f/4-5.6 |
| EF 28-135mm f/3.5-5.6 IS USM | EF 28-200mm f/3.5-5.6 |
| EF 28-200mm f/3.5-5.6 USM | EF 28-300mm f/3.5-5.6L IS USM |
| EF 55-200 f/4-5.6 II USM | EF 55-200mm f/4-5.6 USM |
| EF 70-200mm f/2.8L USM | EF 70-200mm f/4L USM |
| EF 70-200mm f/2.8L IS USM | EF 70-200mm f/4L IS USM |
| EF 70-300mm f/4-5.6 IS USM | EF 70-300mm f/4.5-5.6 DO IS USM |
| EF 75-300mm f/4.5-5.6 II | EF 75-300mm f/4-5.6 III |
| EF 75-300mm f/4-5.6 USM | EF 75-300mm f/4-5.6 II USM |
| EF 75-300mm f/4-5.6 III USM | EF 90-300mm f/4.5-5.6 |
| EF 90-300mm f/4.5-5.6 USM | EF 100-300mm f/4.5-5.6 USM |
| EF 100-400mm f/4.5-5.6L IS USM | |
| EF-S lenses | |
|---|---|
| EF-S 60mm f/2.8 Macro USM | EF-S 10-22mm f/3.5-5.6 USM |
| EF-S 17-55mm f/2.8 IS USM | EF-S 17-85mm f/4-5.6 IS USM |
| EF-S 18-55mm f/3.5-5.6 | EF-S 18-55mm f/3.5-5.6 II |
| EF-S 18-55mm f/3.5-5.6 USM | EF-S 18-55mm f/3.5-5.6 II USM |
| EF-S 18-55mm f/3.5-5.6 IS | EF-S 18-200mm f/3.5-5.6 IS USM |
| EF-S 55-250mm f/4-5.6 IS | |
-blabpictures-
Subscribe to:
Posts (Atom)

