Showing posts with label DPP. Show all posts

24 April 2009

Does sharpening add up in DPP?

Recently the world famous camera store in New York known as B&H has made available a really interesting video of a seminar presented by Erik Allin from Canon USA. The seminars are all about the Canon software. If you want to find no better use for the best part of two hours it's worth a watch. Even better is that the section with the demonstration of techniques in the Canon Digital Photo Professional software are covered in probably some of the most depth ever seen in the wild. Check out video 2 of 3 and 3 of 3 particularly. Big thanks for that Erik and B&H

However on the topic of sharpening we'd like to dispute the claims made in the video that you can choose to do sharpening in either the RAW or RGB tabs of DPPs tool palette. In our quick test the two sharpening sliders are cumulative. So set +10 sharpening in the RAW tab and then set +500 sharpening in the RGB tab. We found that with both sets of sharpening set to the max then it's more sharpened than when either of them individually is set to the maximum. 

These images are screenshots from DPP edit image window and are in split screen mode at 100% view.

RAW +10 sharpening, RGB 0 sharpening
RAW10
RAW +10 sharpening, RGB +500 sharpening
RAW10-RGB500
RAW 0 sharpening, RGB +500 sharpening
RGB500
To me it seems that the RAW sharpening is applied to the RAW data and then additional sharpening on the RGB data is applied, one small contradiction in an otherwise great presentation.

So to answer the title question, RAW sharpening in DPP does add up.

-blabpictures-

6 April 2009

Digital Photo Professional 3.6 adds shadow and highlight controls

dpp-3.6Canon has made the latest version of it's RAW image processing software digital photo professional [DPP] available for download, and it has new controls to deal with shadow and highlights in images separately.

It's a strange round of coincidences, but the firmware update for the PowerShot SX1 IS that we reported in February here on the blog meant that Canon needed to make a version of RAW image processing software available for the now RAW capable PowerShot, that version is 3.6.0.2 and can be downloaded from Canon's website along with the PowerShot SX1 IS firmware updater. You'll need a valid serial number for a PowerShot SX1 IS to get access to the files, and the kind folks at www.learnslr.com have one that works fine. Once at the site you'll find the DPP version 3.6 too, and this is what you really want for your EOS camera as it adds the shadow and highlight sliders to the RAW tab of the tool panel.


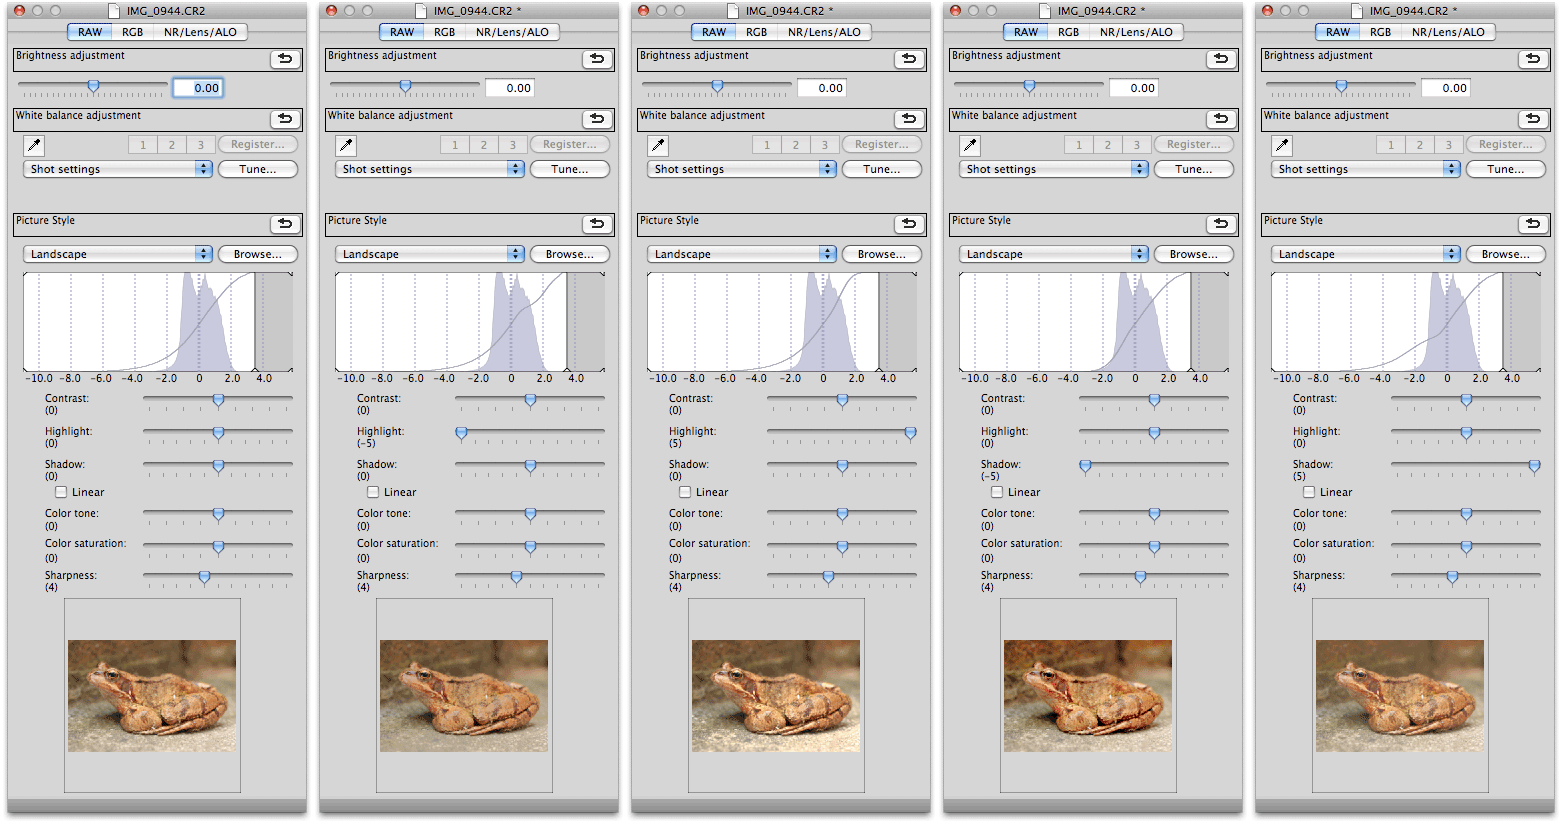
dpp-animationThis quick animation shows the effect of changing the shadow and highlight sliders to their maximum and minimum settings 5 and -5 respectively. In essence the highlight slider affects the shape of the upper part of the tone curve, watch the animation and particularly the tone curve in the histogram box as the different slider settings cycle through. Similarly the shadows setting adjusts the lower half of the tone curve without affecting the upper part. You can combine the effects of shadow and highlight sliders if needed. This is a real boon for DPP users who previously could only make the tone curve steeper or flatter in total, and will reduce the need for this kind of fix in Photoshop to be done to a whole image.

The only concern so far for EOS users could be that there is only DPP 3.6 available. Often DPP updaters need the matching EOS Utility ones, and for now there is no such download available. If you use EOS Utility for tethered shooting or remote camera control you may be better to wait, since surely with the imminent launch of the EOS 500D Canon will make a set of DPP and EOS Utility updaters available from their normal download sites.

Please Canon make the next feature the ability to straighten the horizon in pictures?

-blabpictures-

19 March 2009

Using DPP to make changes to multiple images at the same time

Canon's Digital Photo Professional (DPP) is supplied with each and every EOS camera but many photographers only touch the features on the surface.

Did you know that you can apply adjustments to a group of images in the main window all at once?
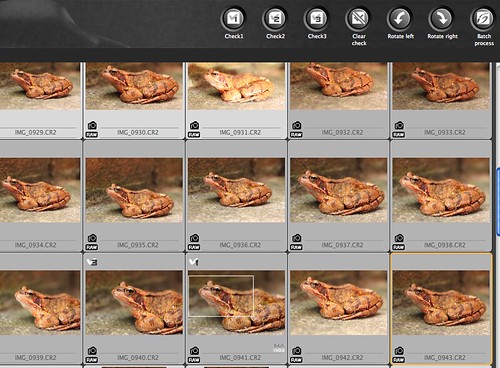
DPP main window


DPP tool panelSimply select a group of images in the main window then activate the tool panel using either APPLE-T or CTRL-T. Then all the changes you make in the RAW adjustment tab are applied to the group of selected images. Global white balance changes, Picture Style changes sharpening can all be done quickly and simply this way.

What's more if you set DPP to normally give you AdobeRGB images as outputs then you can also goto Adjustment menu and select Work color space and then you can change a group of images from AdobeRGB to sRGB or one of the other colour spaces listed. This is handy if you usually use AdobeRGB outputs and need to make some quick proof images for a web gallery. Typically sRGB is more readily accepted by internet browsers and so sRGB images are needed, but this quick change makes this simple for a group of images.

-blabpictures-

9 March 2009

Are your high ISO RAW images soft with DPP

There's been some people saying that Canon RAW images taken at higher ISO settings are too soft straight from Canon's Digital Photo Professional software. In the latest versions of DPP Canon made some changes in the preferences and the noise reduction processing. If you simply downloaded the updaters from Canon's software center at http://software.canon-europe.com then you might benefit a quick check of your DPP preferences.

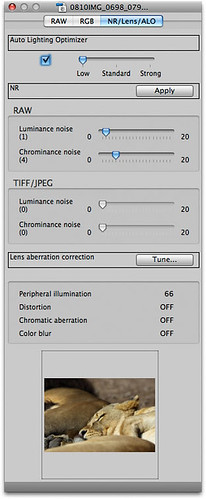
DPP-NR-slidersFirst, here's an image in DPP and checking the NR/Lens/ALO tab you can see the luminance and chrominance noise reduction sliders are set to 1 and 4 respectively. The reason is that the later versions of DPP automatically set these sliders based on the ISO setting, the camera model and maybe the shutter speed, in-camera noise reduction settings etc.

As the ISO increases, and this image is only ISO 200 on an EOS 50D, then the sliders will be preset automatically to increased values.

However remember that as this is a RAW image, so you can change this setting. If you don't want as much chrominance or luminance noise reduction then move the slider to a lower number.


blab:
'there are many ways to skin the noise reduction cat'
The problems seem to come at the extremes of ISO. People with EOS 5D Mark II and EOS 50D shooting at ISO 12,800 and beyond then you often see these sliders move pretty much all the way to the end points and a lot of noise reduction is done. The downside is that it can make the resulting images a bit soft and lacking detail for some tastes.


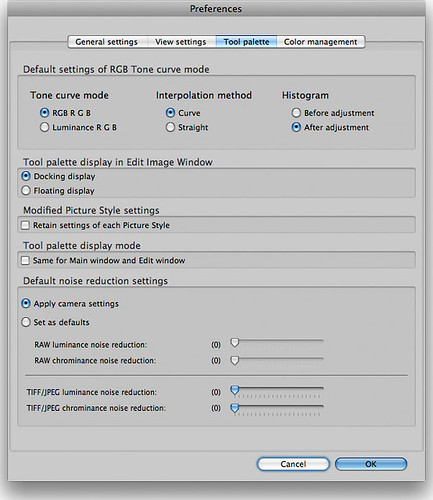
In Digital Photo Professional the preferences allows you to override all this automatic selection of noise reduction parameters. Choose the 'Set as defaults entry and set your levels, even no noise reduction if that suits.

DPP-preferences


The key here is the 'Default noise reduction settings' section. If you just have been adding the updaters to older versions of DPP then your stored preferences won't have an entry and so you get the default 'Apply camera settings' and then DPP chooses the settings for you as a starting point. If you like you can choose your own settings to be applied to all your images, and you can still change it in DPP NR/ALO/Lens tab for each image.

If you regularly shoot High ISO, or do so for a specific job and employ a noise reduction workflow in your post production then you may want to set DPP to not apply any noise reduction by default - or only a very little bit.

Any thoughts and comments or even suggested settings would be welcomed in the comments. You can even mention third party software for noise reduction if you like... we dare you!!

-blabpictures-

19 February 2009

RAW support added to the PowerShot SX1 IS

A tiny bit of news, but valuable for those who use Canon's Digital Photo Professional software for processing their RAW images.

With the announcement of the PowerShot SX1 IS for the USA market yesterday Canon also announced that they are making a firmware update to add RAW image support to the camera for the exisiting customers. Let's not forget that the PowerShot SX1 IS already has a Canon CMOS sensor and full HD video capture; RAW is a nice addition for free. The new firmware will be available to download from Canon's BeBit site http://web.canon.jp/imaging/BeBit-e.html from mid-March, and there will also be an updated version of Digital Photo Professional to work with the RAW images. This now means that photographers who mostly use EOS cameras can also work with the RAW images from the PowerShot G10 and (soon) the PowerShot SX1 IS. Maybe this helps your choice of compact camera, because it seems like there's no new Canon DSLR going to be announced for PMA, the first time since 2001.

-blabpictures-

15 December 2008

Peripheral Illumination Correction

The perfect lens. Oh how nice that would be. Sadly, it's just not possible. Well, not unless you're a multi millionaire and are willing to pay many millions for each lens. Even then optical physics gets in the way and there would have to be compromises. Oh, and if you had "the perfect lens" you wouldn't be able to carry many of them!

So, with that in mind, Canon introduced a feature to DPP a while ago to help correct the problem of corner shading. Essentially they used testing and optical data to work out how a lens responds on a particular camera and then it can be corrected automatically. Simply go to the DPP NR/Lens/ALO tab and choose tune next to Lens Aberration Correction.

Now, that's all well and good, but what about in camera? Well, since they've got the data, there is no reason why, in theory, it couldn't be put into the camera. And that's what they've done with the DIGIC 4 processor. So, on the EOS 50D and EOS 5D Mark II there is a Peripheral Illumination Correction option in the menu that allows you to enable or disable it.

Obviously it only works with Canon lenses, and currently it's only working for around 40 lenses. 26 are pre-loaded into the camera and the rest, up to a maximum of 40 at a time, can be added using EOS Utility.

What you should remember about this is that it's nothing to do with AF Microadjustment, which we'll look at in a future post.

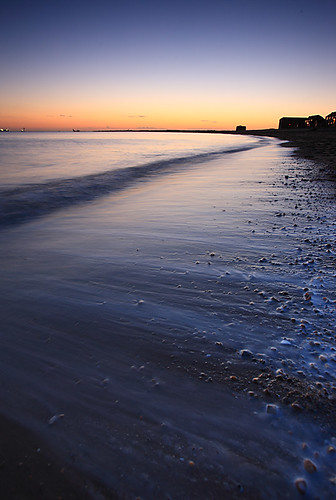
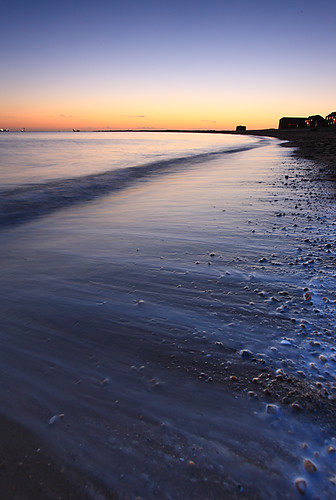
What does it look like? Well, the images below should give you some idea.

Oh, and in the image that has darker corners, it's not vignetting! Vignetting is a hard corner and has different causes. This is a softer corner and is caused by light not striking the pixels in the corners of the frame squarely.

PIC OFF
PIC_OFF0001

PIC ON
PIC_ON0001


-blabpictures-

26 November 2008

Why DPP?


So, DPP then. What's all the fuss? 
Well for a start, Canon include it with the camera. That's a bonus right off the bat. Unlike some other manufacturers, when you buy a Canon camera it's all there in the box. Thoughtful of them isn't it? 
So if it's all provided, why are there so many third party RAW converters? Well, it's simple not everyone is the same and many people think if the software is given away free, it can't be any good. And that, dear readers, is mistake number one. 
Now, the reasons to use DPP are several, I'm going to put two to you now:
1. No-one knows Canon files like Canon
2. Picture Styles
Number one is pretty self explanatory really. Since Canon make the camera and the CMOS sensor and the DIGIC processor, you'd think they'd know what the output would be and would therefore make a nice bit of software to make the most of it. And you'd be right. 
Number two probably needs more explaining. Here's goes....
While you may choose not to use Picture Styles, the fact is when you take an image on a Canon EOS camera, the LCD display will show you a preview with whichever Picture Style you happen to have set. If you happen to take a quick chimp at the LCD panel and decide you've got the shot you're after, you'll move on. All well and good so far. Trouble comes when you put the RAW into a third-party RAW convertor. They don't deal with Picture Styles, so your image will look a little flatter and less vibrant than it did on the LCD panel. If you did indeed take a look at the LCD display and decided you liked the shot, this can be a let down. 
Before you all comment and tell me that you can process back to where you were using the tools in your RAW convertor of choice, remember that means more time in front of the computer. If you're a photographer who tries to get it right in camera (and that should be all of us, right?) then you may not want to spend ages processing each image back to get it where it could be if you only used Picture Styles and DPP. And as far as I'm concerned, the less time I have to spend processing images, the better. 


-blabpictures-

1 November 2008

Lens aberration correction - compatible lenses

Canon added lens correction functions to Digital Photo Professional in version 3. In essence the software engineers got access to the lens designers manual for each lens. In the lens manual there's the full design specification and the known optical characteristics. The software guys thought that they could improve some lenses performance with some software processing, but having the original lens designers book they could implement one of the best corrections possible; so they did. The result is some kind of special since it actually works really well, and driven by their success the software guys were out drinking with the camera firmware team and challenged them to implement vignetting correction in the DIGIC 4 processor - and so since they had some spare time and some resource in DIGIC 4 to exploit they built peripheral illumination correction in the EOS 50D and subsequent models. However the correction in camera can be thought of as a helper rather than the full solution. In camera the correction for vignetting is 50% of what DPP can do. Also DPP with RAW images can do distortion - pin cushion & barrel, chromatic aberration and colour blur corrections. Suddenly those old lenses on ebay got a bit more useful.

Here's the current list of compatible cameras and lenses with the Digital Photo Professional software. This is going to be kept live so you may want to come back sometime in the future when new models of camera and lens come out.

You can perform lens correction with the following cameras

EOS-1Ds Mark III EOS-1D Mark III EOS-1D Mark II N
EOS-1Ds Mark II EOS-1D Mark II EOS-1Ds
EOS-1D EOS 5D Mark II EOS 5D *1
EOS 50D EOS 40D EOS 30D *2
EOS 450D

EOS Digital Rebel XSi
EOS 400D

EOS Digital Rebel XTi
EOS 1000D

EOS Digital Rebel XS

*1 - Requires firmware version 1.1.1 or higher for maximum lens compatibility

*2 - Requires firmware version 1.0.6 or higher for maximum lens compatibility


Ultra wide and wide-angle lenses
EF14mm f/2.8L USM EF 14mm f/2.8L II USM
EF 20mm f/2.8 USM EF 24mm f/1.4L USM
EF 24mm f/1.4L II USM EF 24mm f/2.8
EF 28mm f/1.8 USM EF 28mm f/2.8
EF 35mm f/1.4L USM EF 35mm f/2


Standard and medium telephoto lenses
EF 50mm f/1.2L USM EF 50mm f/1.4 USM
EF 50mm f/1.8 EF 50mm f/1.8 II
EF 85mm f/1.2L USM EF 85mm f/1.2L II USM
EF 85mm f/1.8 USM EF 100mm f/2


Telephoto lenses
EF 135mm f/2L USM EF 135mm f/2.8
(with soft focus mechanism)
EF 200mm f/2L IS USM EF 200mm f/2.8L USM
EF 200mm f/2.8L II USM EF 300mm f/2.8L IS USM
EF 300mm f/4L IS USM EF 400mm f/2.8L IS USM
EF 400mm f/5.6L USM EF 400mm f/4 DO IS USM
EF 500mm f/4L IS USM EF 600mm f/4L IS USM
EF 800mm f/5.6L IS USM


Macro lenses
EF 100mm f/2.8 Macro USM EF 180mm f/3.5L Macro USM


Zoom lenses
EF 16-35mm f/2.8L USM EF 16-35mm f/2.L II USM
EF 17-35mm f/2.8L USM EF 17-40mm f/4L USM
EF 20-35mm f/3.5-4.5 USM EF 24-70mm f/2.8L USM
EF 24-85mm f/3.5-4.5 USM EF 24-105mm f/4L IS USM
EF 28-70mm f/2.8L USM EF 28-90mm f/4-5.6 USM
EF 28-90mm f/4-5.6 II USM EF 28-90mm f/4-5.6
EF 28-90mm f/4-5.6 II EF 28-90mm f.4-5.6 III
EF 28-105mm f/3.5-4.5 USM EF 28-105mm f/3.5-4.5 II USM
EF 28-105mm f/4-5.6 USM EF 28-105mm f/4-5.6
EF 28-135mm f/3.5-5.6 IS USM EF 28-200mm f/3.5-5.6
EF 28-200mm f/3.5-5.6 USM EF 28-300mm f/3.5-5.6L IS USM
EF 55-200 f/4-5.6 II USM EF 55-200mm f/4-5.6 USM
EF 70-200mm f/2.8L USM EF 70-200mm f/4L USM
EF 70-200mm f/2.8L IS USM EF 70-200mm f/4L IS USM
EF 70-300mm f/4-5.6 IS USM EF 70-300mm f/4.5-5.6 DO IS USM
EF 75-300mm f/4.5-5.6 II EF 75-300mm f/4-5.6 III
EF 75-300mm f/4-5.6 USM EF 75-300mm f/4-5.6 II USM
EF 75-300mm f/4-5.6 III USM EF 90-300mm f/4.5-5.6
EF 90-300mm f/4.5-5.6 USM EF 100-300mm f/4.5-5.6 USM
EF 100-400mm f/4.5-5.6L IS USM


EF-S lenses
EF-S 60mm f/2.8 Macro USM

EF-S 10-22mm f/3.5-5.6 USM

EF-S 17-55mm f/2.8 IS USM EF-S 17-85mm f/4-5.6 IS USM
EF-S 18-55mm f/3.5-5.6 EF-S 18-55mm f/3.5-5.6 II
EF-S 18-55mm f/3.5-5.6 USM EF-S 18-55mm f/3.5-5.6 II USM
EF-S 18-55mm f/3.5-5.6 IS EF-S 18-200mm f/3.5-5.6 IS USM
EF-S 55-250mm f/4-5.6 IS


-blabpictures-