Showing posts with label focus. Show all posts

9 May 2009

Focus distance limit switches on lenses

Some of the Canon lenses feature a little slide switch to let you restrict the range of focus distances the lens will operate over, but why? 

With the longer focal length lenses there's often quite narrow depth of field and also quite a large range of movement for the optics to cover from the closest focus distance out to infinity. If your subjects easily fall in to the range covered by a lens restricted limit switches then you get a much faster focus shift from minimum to maximum subject distance as the focus assembly only moves a small set of it's possible range. There are quite a lot of lenses in the range with focus limit switches including the EF100mm f/2.8 MACRO USM, EF135mm f/2L USM, EF70-200mm f/4L IS USM. In fact most L series lenses with focal lengths longer than 100mm have focus limit switches. In the case of a mega lens like the Ef800mm f/5.6L IS USM there's three positions for the limiter including the full 6 metre close focus to infinity range!

Coming back to something more normal the popular EF70-200mm f/4L IS USM has focus limit ranges 1.2m to infinity and 3m to infinity. So if you are shooting say motorsport and are over 3m from the track boundary choose the restricted range of focus, the lens will move from the new 3m minimum focus to infinity much faster than it would from 1.2m to infinity. This makes the AF seem more snappy when you pick up a camera and the initial focus is way off. There's just less time spent hunting for the subject while the lens racks in and out from minimum to maximum focus distances.

-blabpictures-

13 March 2009

Back button focus

Exposure lockBack button focus is one of the functions on EOS digital SLR cameras that gives a new layer of control over the picture taking process. In simple terms it places the shutter release, exposure lock and focus lock or activation on up to three separate buttons. If you have only ever used the 'out of the box' configuration with the AF activated with the half press on the shutter and the AE lock occuring with the focus lock in evaluative metering and this is not suiting you then it may be something to experiment with - though it's an acquired skill.

Probably one of the best articles on the topic is actually on the Canon USA website in their digital learning center. The article highlights five often quoted advantages of back button focus;
  1. Easier to lock focus
  2. Easier timing of shots
  3. Less risk of focus errors with moving subjects
  4. Easier over-riding of AF with full-time manual focus
  5. Easier macro and close up focussing
With the latest EOS cameras from the mid-range up providing separate buttons for AF-ON and AE lock '*' then there's also a function to switch round the operation of the two buttons. Great if you plan on using back button focus on an EOS 450D and an EOS 50D, as the EOS 450D doesn't have the separate AF-ON button and then the placement of the buttons may be out of sync with the two cameras.

Some photographers find that the use of back button focus eliminates the need to switch between AI Servo and One-shot AF modes. They simply use AI Servo all the time and switch the AF off when they have the right focus for their picture.

You might also find the previous article on blabpictures about AE lock and the metering pattern valuable further reading.

-blabpictures-

28 February 2009

Focussing screens - more than standard

All the EOS cameras feature a ground glass focussing screen. It's the translucent surface you see when you look through the viewfinder. We've explained before the importance of correctly setting the dioptre correction so that the screen is correctly viewed by the photographer. An increasing number of the EOS cameras allow you to change the focussing screen and it's something worth doing if your style of photography suits something more than standard.

Standard
The standard focussing screen fitted to your EOS is designed to give a bright clear image in a wide range of conditions and with a wide range of lenses. The maximum aperture of a lens determines how bright the screen can be, with lenses that have f/5.6 apertures giving a darker - harder to see - screen than lenses with faster apertures like f/1.4. The standard focussing screen has a special ground glass surface that effectively amplifies the light so even the slower f/5.6 lenses give a reasonably bright viewfinder.

Grid screen 
The first alternative screen is the grid screen, this one has a set of fine lines etched on it's surface making a grid pattern. These lines can help you with composition and also to keep horizons level and stop you composing with buildings falling over. In some cases they are used for technical purposes too. Brightness and viewfinder performance wise these screens are based on the standard ones so work well with all lenses.

Super precision matte - 'manual focus' screen
The first of the specialist screens is the super precision matte screen, sometimes called the 'manual focus' screen. This one has a different ground surface and as a result shows an almost real view of the actual depth of field that a lens and aperture combination will produce. The standard screen tends to show images with too much depth of field. The downside of this screen is that it gets darker quite a lot faster so Canon recommends it for f/2.8 aperture or faster lenses - exactly the ones you may be doing critical manual focus with.

Changing the focussing screen is quite simple, you remove the lens and release a small catch in the top of the mirror box, the screen drops down and using the tool supplied with each accessory focussing screen you lift out the existing one and replace with the alternates. Don't ever touch or try to clean the surface of the focussing screen, you'll end up buying a new one, but at around twenty to thirty pounds they are not expensive. When you change the focussing screen you need to set the appropriate custom function in the camera, this tells the exposure metering about the characteristics of the screen in use and tailors the metering system appropriately.

All EOS-1D models can have the focussing screen changed, as can EOS 5D, EOS 5D Mark II and also EOS 40D and EOS 50D. Some third parties provide screens and instructions for other models though you may invalidate your warranty if you fit them yourself.

Generally Ec-'X' screens are for EOS-1D models, Ed-'X' for EOS 5D, Ef-'X' for EOS 40D / EOS 50D and Eg-'X' for EOS 5D Mark II.

'X' indicates the type of screen, D = grid screen, S = super precision matte, A = standard screen.

In the case of the EOS-1D models there's a much more extensive range of focussing screens available including microprism and split image screens.


EOS 40D/ 50DEOS 5D Mark II


-blabpictures-

26 February 2009

It's over... just for another year!

Well that's it, it's all over. Focus on imaging 2009 has been and gone. If you missed it, you'll have to wait another year for it to come around again. 

We'll compile a longer post about Focus at some point shortly, but so far our favourite things from the show were:
New PocketWizards..... mmmmmmm I can't wait
The discounts on recently discontinued Elinchrom flash heads at The Flash Centre
The speed with which EOS 5D Mark II cameras seemed to be flying over the Jacobs counter
Picking up a California sunbounce at a very good price
The seminars on the Canon stand - very interesting stuff
The lack of crowds this year making it easier to move around
Bumping into old friends we've not seen for a year

What we didn't like were:
The stupid questions some of the guys on the Canon stand had to put up with
The people carrying cameras around - seriously, what are you going to take pictures of?
The people carrying cameras around their neck with no lens on. See above.

-blabpictures-

24 February 2009

Focus...have you been?

We've been up at Focus today having a look around, hence the lack of a post so sorry for that... Did you miss us?!
Anyway, have you been yet? It seems busier than expected given the financial situation, but not as busy as last year.
There were some good deals to be had as well and we managed to get a short hands on look at those new Pocket Wizards as well! Yes, they're as sexy in real life, but a bit bigger than expected! They're certainly on our shopping list for the near future.

Canon have a large presence again, in fact it seems to be the biggest and the busiest stand around. They have a whole booth of EOS 5D Mark II cameras as well as the rest of the range and a lens bar with all the large white lenses arranged. There are also some really interesting free seminars being given upstairs, so if you're going tomorrow, check them out early as they book up quick.
I wouldn't expect too many last day deals on Canon kit this year. Most places seem to be running low on stock so they won't be discounting as heavily at a guess.

Anyway, have you been? If so, what did you think? Did you buy anything?

-blabpictures-

2 February 2009

Exposure metering lock – what the manual doesn’t tell you

blab:
Only the evaluative metering pattern locks the exposure when focus is achieved
Canon EOS cameras have a choice of ambient light metering patterns available when you shoot in the creative zone modes; P, Tv, Av, M, A-DEP. Most cameras feature Evaluative, Center-weighted, Partial and Spot metering choices. One of the hidden gems in the Canon engineers’ wisdom is that there are two different approaches to automatic exposure lock that depend on the metering pattern employed. If you use the focus lock and recompose technique in your photography you need to read this.

center-weighted metering patternWith evaluative metering and one-shot AF the camera will lock the exposure reading at the same time as the AF locks. You can prove this yourself, put your camera in one-shot AF and evaluative metering pattern. Then half press the shutter and once the focus is found keep your finger on the shutter and recompose your scene with a significant change of brightness, point the camera skyward for example. You should see that the shutter speed and aperture don’t change. To prove this we set up a test scene and pointed the centre AF point at the 7 in 70-200 on the lens and took a picture, then we repeated the shot and once focus lock was acheived moved the camera to put the centre AF point over the black strap on the edge of the camera. Surprise - or not - both shots have the same exposure settings.

IMG_0931  IMG_0932

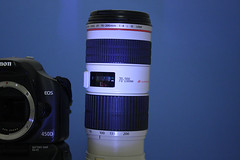
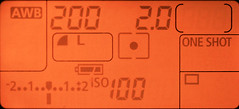
Both shots, 1/30s at f/5.6 - autofocus lock while framing with the 70 on lens at the centre AF point, exposure locks with the focus.


spot metering patternIf you are using Spot, Partial or Center-weighted metering, then the camera doesn’t lock the exposure until the shutter is pressed to take the picture. This means if you use focus lock and recompose then once the AF is complete and locked the metering isn’t. If your recomposed shot is significantly different in brightness then you will have the exposure for the recomposed scene not the focus locked scene. This can be a significant difference with spot or partial metering. Imagine you thought you took a spot meter reading from a persons face, focussed and locked the focus on the eyes then recomposed to put the person off centre for composition, except the person is in front of a black background. You just got over exposed skin tones in your picture.

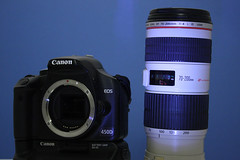
Back to the test scene and partial metering, though spot, partial and center-weighted all exhibit the same behaviour.

IMG_0929  IMG_0930

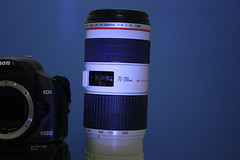
left image: focus lock on the lens, exposure 1/40s at f/5.6
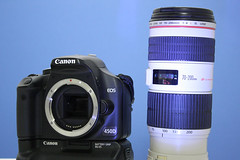
right image: focus lock on the lens, recompose on the strap, exposure 1/13s at f/5.6


Exposure lock
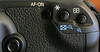
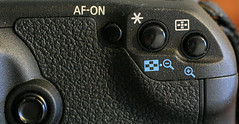
So how to overcome this? The answer is right under your thumb actually, the button marked with the * symbol is the exposure lock. You may need to make use of this when you use Spot, Partial or Center-weighted metering.

Got an EOS-1D series camera? On these models you can choose to have the spot meter reading point linked to the active AF point. If you use this AF point linked spot metering with automatic AF point selection then you may have less problems since the spot meter is most likely on the main subject of your pictures.

This post all applies to one-shot AF, if you use AI servo AF then there’s no automatic focus lock in any metering mode. Also in Manual exposure mode there's also no exposure lock at any time. Check the function availability table towards the back of your camera instruction book.

In another article we’ll cover custom functions for ‘back button focus’ which also has a bearing on when and how the AF and AE settings are locked; don’t you just love interdependencies.

If you follow our twitter feed you may be expecting flash posts, this is laying the ground for those.

-blabpictures-

24 December 2008

Stop the blurred pictures when manual focussing

You've bought a great new EOS camera, and it's got a great autofocus system, though sometimes you just need to focus manually. With the advent of Digital EOS the viewfinders of the cameras were shrunk since the sensors and mirrors also were downsized. This can make it harder to see the correct focus point when you have taken the plunge and 'gone on manual'.

EOS dioptre correctionIf you pictures look blurred in the viewfinder normally, but the camera seems to focus fine then most likely the viewfinder is not set correctly for your eyesight. You need to adjust the viewfinder dioptre correction. It's a bit like the camera needs to be tailored for you, just like glasses or contact lenses are optimised for you. you can find the dioptre correction knob next to the viewfinder. Normally the cameras have a range of +1 to -3 dioptre but you can get additional correction lenses if you need a bigger or smaller correction.

EOS dioptre correctionOn most models the dioptre is easy to locate, but some models, EOS-1D series in particular, it's necessary to remove the eyecup to get at the adjustment. This tends to make it less likely that the adjustment gets changed by accident, and also follows that most pros use the same camera all the time. Your EOS 450D - pictured - may get passed from one family member to the next and need regular changes of dioptre setting.
The dioptre adjustment control is the one circled in yellow.

How do you adjust this viewfinder dioptre setting?
One of the most sensible ways is to remove the lens and simply look through the viewfinder, you are looking at the focussing screen that the images are seen on. If this focussing screen and the various marks, AF points etc look sharp to you then that is a good starting place. You may find it necessary ot point the camera at a brightly lit area or subject to judge this all critically. Once set you could even gaffer tape the control in place if you like - and some do!

It's Christmas eve and no amount of dipotre correction can fix alcohol base focussing - have a good one.

-blabpictures-